Последнее обновление: 10.11.2022
Чтобы облегчить написание, а также тестирование и отладку программного кода нередко используют специальные среды разработки, в частности,
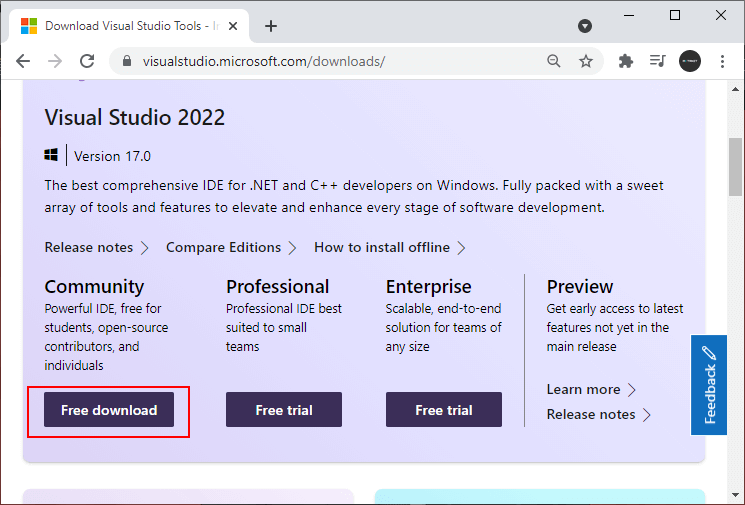
Visual Studio. Рассмотрим создание приложений на C# с помощью бесплатной и полнофункциональной среды Visual Studio Community 2022, которую можно загрузить по следующему адресу:
Microsoft Visual Studio 2022
После загрузки запустим программу установщика. В открывшемся окне нам будет предложено выбрать те компоненты, которые мы хотим установить вместе Visual Studio.
Стоит отметить, что Visual Studio — очень функциональная среда разработки и позволяет разрабатывать приложения с помощью множества языков и платформ.
В нашем случае нам будет интересовать прежде всего C# и .NET.
Чтобы добавить в Visual Studio поддержку проектов для C# и .NET 7, в программе установки среди рабочих нагрузок можно выбрать только пункт
ASP.NET и разработка веб-приложений. Можно выбрать и больше опций или вообще
все опции, однако стоит учитывать свободный размер на жестком диске — чем больше опций будет выбрано, соответственно тем больше места на диске будет занято.
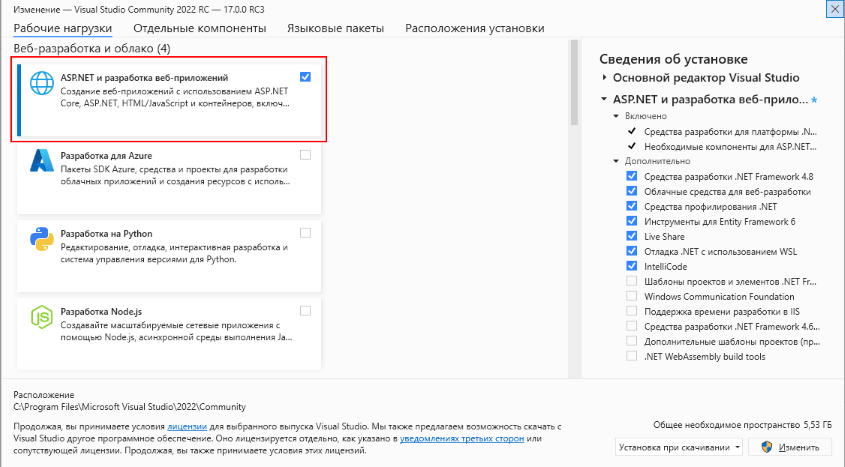
И при инсталляции Visual Studio на ваш компьютер будут установлены все необходимые инструменты для разработки программ, в том
числе фреймворк .NET 7.
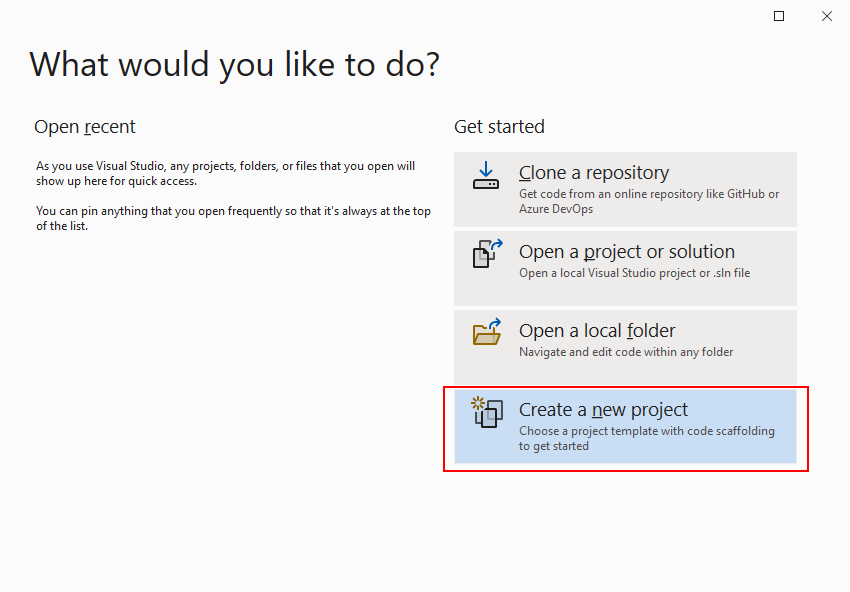
После завершения установки создадим первую программу. Она будет простенькой. Вначале откроем Visual Studio. На стартовом экране выберем
Create a new project (Создать новый проект)
На следующем окне в качестве типа проекта выберем Console App, то есть мы будем создавать консольное приложение на языке
C#
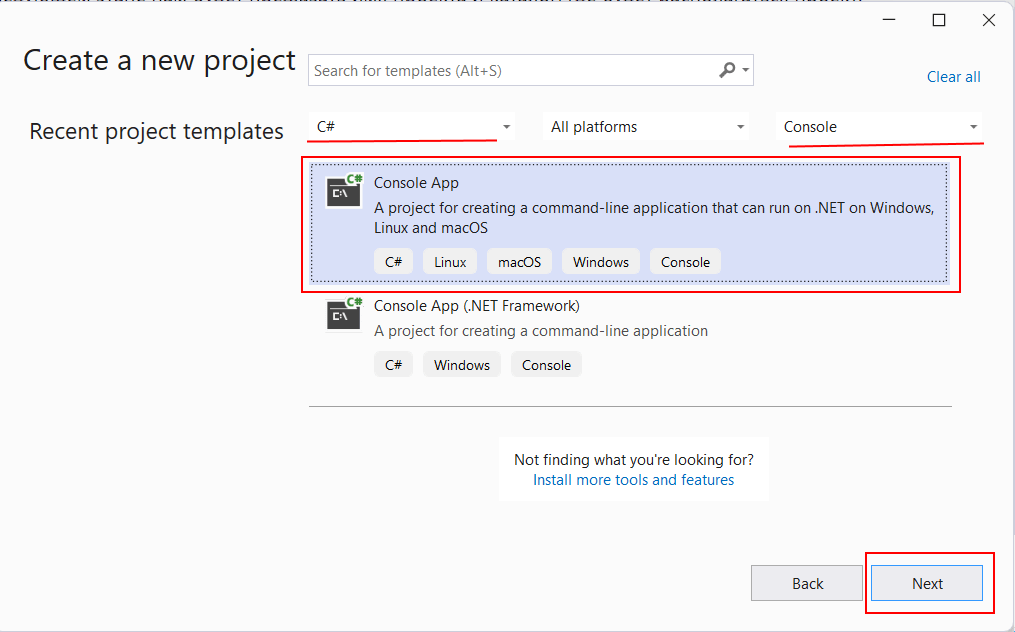
Чтобы проще было найти нужный тип проекта, в поле языков можно выбрать C#, а в поле типа проектов — Console.
Далее на следующем этапе нам будет предложено указать имя проекта и каталог, где будет располагаться проект.
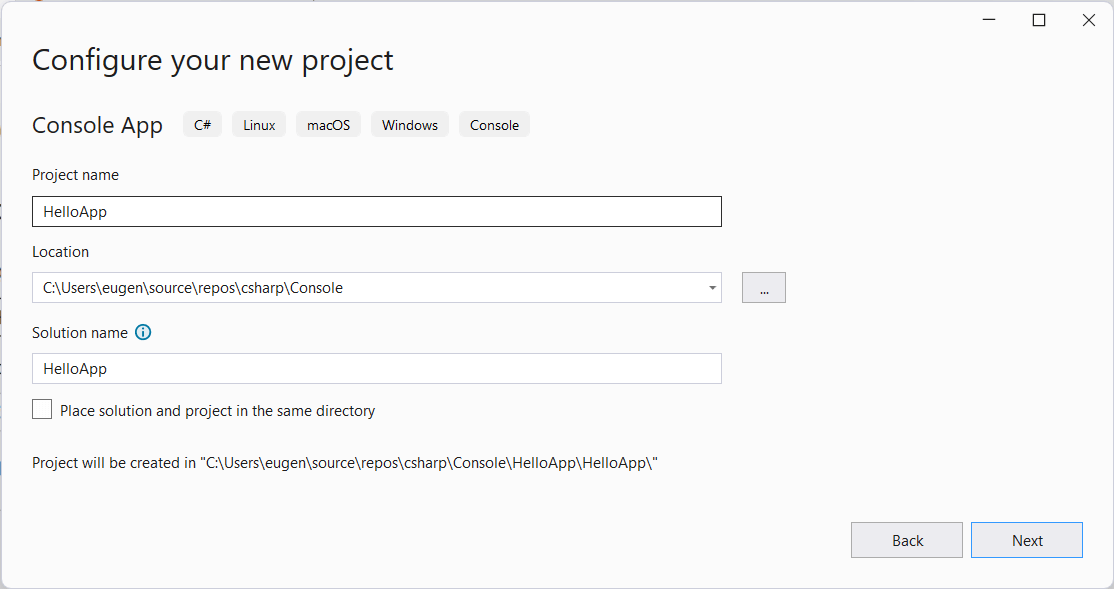
В поле Project Name дадим проекту какое-либо название. В моем случае это HelloApp.
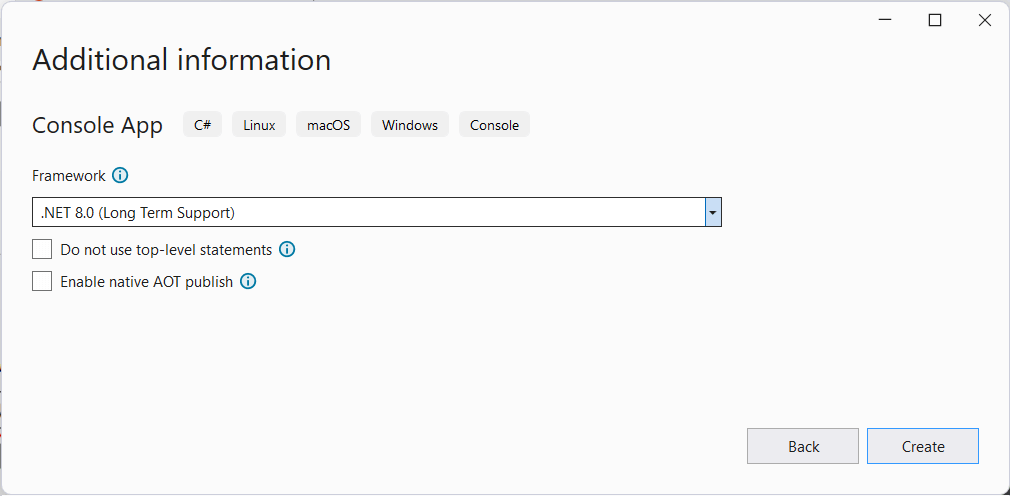
На следующем окне Visual Studio предложит нам выбрать версию .NET, которая будет использоваться для проекта. Выберем последнюю на данный момент верси. — .NET 7.0:
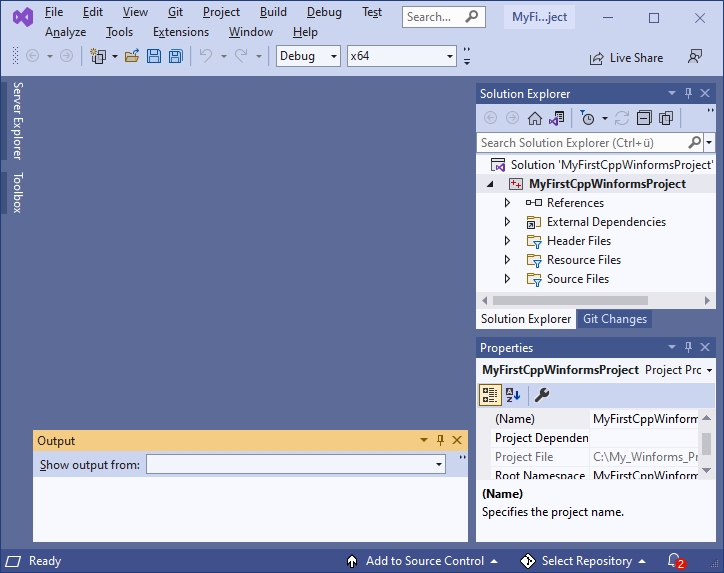
Нажмен на кнопку Create (Создать) для создания проекта, и после этого Visual Studio создаст и откроет нам проект:
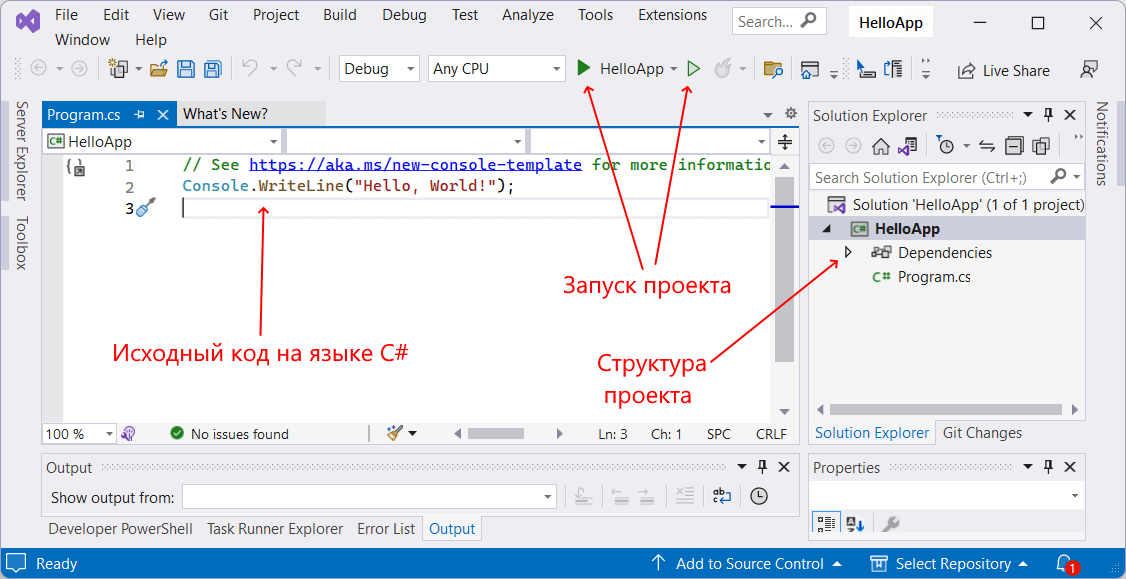
В большом поле в центре, которое по сути представляет текстовый редактор, находится сгенерированный по умолчанию код C#. Впоследствии
мы изменим его на свой.
Справа находится окно Solution Explorer, в котором можно увидеть структуру нашего проекта. В данном случае у нас сгенерированная по умолчанию
структура: узел Dependencies — это узел содержит сборки dll, которые добавлены в проект по умолчанию.
Эти сборки как раз содержат классы библиотеки .NET, которые будет использовать C#. Однако не всегда все сборки нужны. Ненужные потом можно удалить, в то же время если понадобится добавить какую-нибудь нужную библиотеку,
то именно в этот узел она будет добавляться.
Далее идет непосредственно сам файл кода программы Program.cs, который по умолчанию открыт в центральном окне и
который имеет всего две строки:
// See https://aka.ms/new-console-template for more information
Console.WriteLine("Hello, World!");
Первая строка предваряется символами // и представляет комментарии — пояснения к коду.
Вторая строка собственно представляет собой код программы: Console.WriteLine("Hello World!");. Эта строка выводит на консоль строку «Hello World!».
Несмотря на то, что программа содержит только одну строку кода, это уже некоторая программа, которую мы можем запустить.
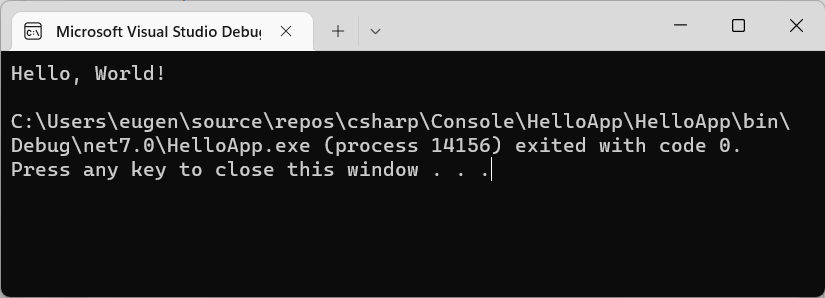
Запустить проект мы можем с помощью клавиши F5 или с панели инструментов, нажав на зеленую стрелку. И если вы все сделали правильно,
то при запуске приложения на консоль будет выведена строка «Hello World!».
Теперь изменим весь этот код на следующий:
Console.Write("Введите свое имя: ");
var name = Console.ReadLine();       // вводим имя
Console.WriteLine($"Привет {name}");    // выводим имя на консоль
По сравнению с автоматически сгенерированным кодом я внес несколько изменений. Теперь первой строкой выводится приглашение к вводу.
Console.Write("Введите свое имя: ");
Метод Console.Write() выводит на консоль некоторую строка. В данном случае это строка «Введите свое имя: «.
На второй строке определяется строковая переменная name, в которую пользователь вводит информацию с консоли:
var name = Console.ReadLine();
Ключевое слово var указывает на определение переменной. В данном случае переменная называется name. И ей
присваивается результат метода Console.ReadLine(), который
позволяет считать с консоли введенную строку. То есть мы введем в консоли строку (точнее имя), и эта строка окажется в переменой name.
Затем введенное имя выводится на консоль:
Console.WriteLine($"Привет {name}");
Чтобы ввести значение переменной name внутрь выводимой на консоль строки, применяются фигурные скобки {}. То есть при выводе строки на консоль
выражение {name} будет заменяться на значение переменной name — введенное имя.
Однако чтобы можно было вводить таким образом значения переменных внутрь строки, перед строкой указывается знак доллара $.
Теперь протестируем проект, запустив его на выполнение, также нажав на F5 или зеленую стрелочку.
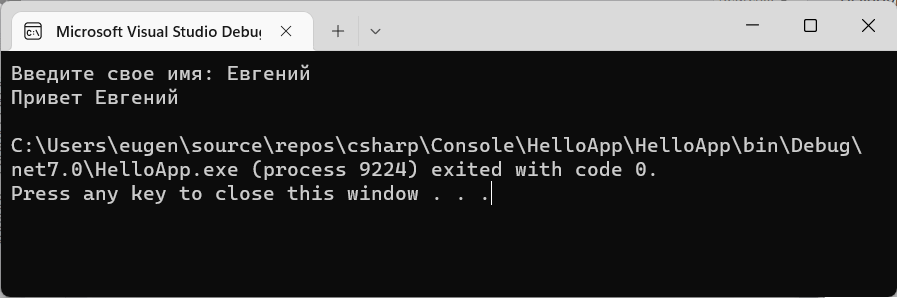
Скомпилированное приложение можно найти в папке проекта в каталоге binDebugnet7.0. Оно будет называться по имени проекта и иметь расширение exe.
И затем этот файл можно будет запускать без Visual Studio, а также переносить его на другие компьютеры, где установлен .NET 7.
In Visual Studio up to version 2010, Templates for Windows Forms projects are pre-installed, but not as of Visual Studio 2012. For these newer versions of Visual Studio you have to install an extension.
This tutorial is for Visual Studio 2022, but applies essentially the same to other versions of Visual Studio (2019, 2017, 2015 and earlier).
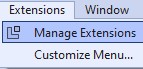
Installing the extension for Windows Forms projects with C++
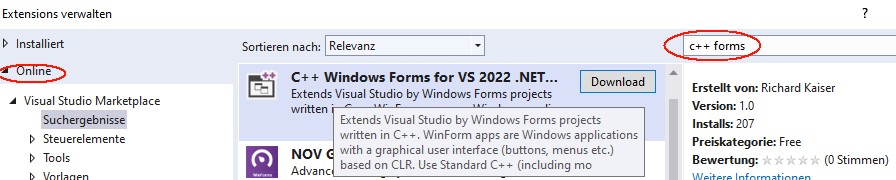
This extension is installed in Visual Studio 2022 under Extensions|Manage Extensions
After clicking Download at “C++ Windows Forms for Visual Studio 2022 .NET Framework”
and closing Visual Studio you get the message
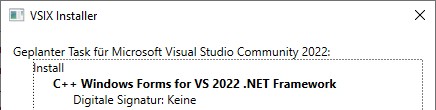

Click Modify to install the extension.
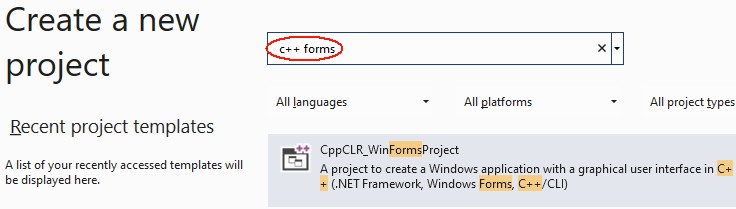
After the next start of Visual Studio under File|New|Project you will find the CppCLR_WinformsProject template:

With this template you can create Windows Forms projects written in C++. Such a project creates a Windows application with a graphical user interface (buttons, menus, etc.), for example:

Standard C++ (including almost all extensions of C++11, C++14, C++17) is used as programming language for the business logic. Only for accessing Windows controls C++/CLI is necessary. This is a simple C++ dialect for the .NET Framework.
The book „C++ mit Visual Studio 2019 und Windows Forms-Anwendungen“
The following is a brief excerpt from my book (in German)
which is still up to date with Visual Studio 2022. All examples and projects can be created and compiled in Visual Studio 2022 as in Visual Studio 2019.
Installing Visual Studio for Windows Forms Projects
In order to create Windows Forms projects in Visual Studio, particular components must be installed during the installation of Visual Studio. If this was forgotten during the installation, start the Visual Studio Installer either under Windows|Start
or in Visual Studio under File|New|Project|Create new project (at the end of the project list)

In the installer, check .NET desktop development, desktop development with C++ and C++/CLI support:

Create a Windows Forms project
After restarting Visual Studio, Windows Forms projects are available under Create New Project or File|New|Project:
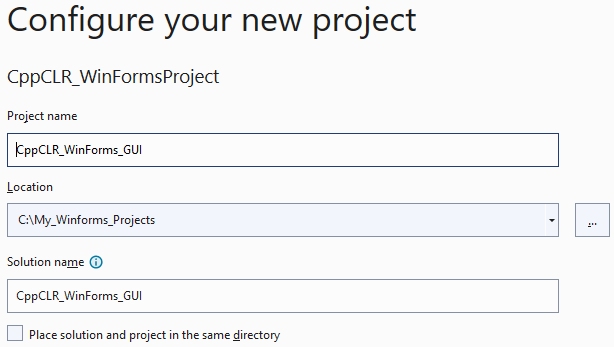
Click the Next button. Then you will be prompted to enter the name of the project and a directory:

After clicking the Create button, Visual Studio looks something like this:
If you now click on Form1.h in the Solution Explorer, the form is displayed:
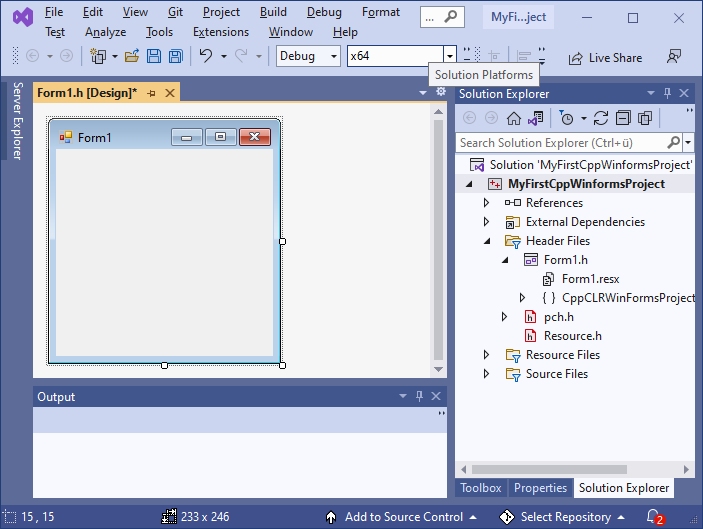
Normally, everything is done and you can continue with the next section. However, if you get something like this

you have clicked Form1.h too fast. Close this window

and click again on Form1.h in the Solution Explorer.
Visual Programming: A first small program
Now, before we get started with our first little program, let’s rearrange Visual Studio a bit to make it easier to use.
After installing Visual Studio, the Toolbox is offered at the left margin.
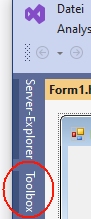
To prevent the toolbox from covering the form, drag the toolbox to the frame with the Solution Explorer (press the left mouse button on the title bar of the toolbox, then move to the title bar of the Solution Explorer with the mouse button pressed and release the mouse button).
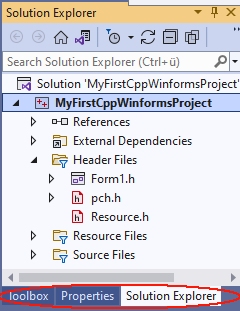
Drag the properties window analogously to the Solution Explorer.
Since we initially only need the Toolbox, Solution Explorer and Properties window, you can close all other windows here (e.g. Git Explorer, etc.). Then the right frame looks something like this:
With the Windows Forms project from Section 1.4, Visual Studio then looks like this:
Next, we will now write a first small program.
The form (here Form1) is the starting point for all Windows Forms applications. It corresponds to the window that is displayed when the program is started:
![]()
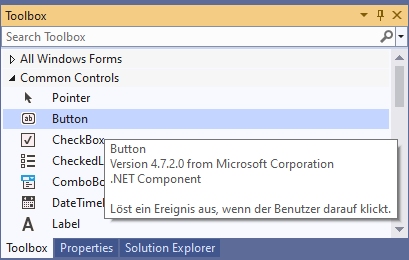
Controls from the Toolbox can be placed on a form. The Toolbox contains essentially all the controls commonly used in Windows. They are located in various groups (e.g. General Controls, Containers, etc.), which can be expanded and collapsed. Most of these controls (such as a button) are displayed on the form while the program is running. If you stop with the mouse pointer briefly on a line of the toolbox, a small hint appears with a short description:
To place an element from the toolbox on the form, simply drag it from the toolbox onto the form. Or click on it in the toolbox first and then click on the position in the form where you want the upper left corner to be.
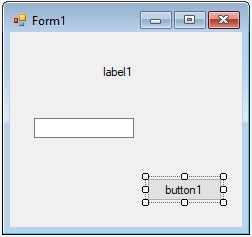
Example: After placing a Label (line seven in Common Controls, with the capital A), a TextBox (fourth line from the bottom, labelled ab) and a Button (second line labelled ab) on the form, it looks something like this:
By playing around like this, you have already created a real Windows program – not a particularly useful one, but still. You can start it as follows:
- with Debug|Start Debugging from the menu, or
- with F5 from any window in Visual Studio or
- by starting the exe file generated by the compiler.
This program already has many features that you would expect from a Windows program: You can move it with the mouse, resize and close it.
Do not forget to close your program before you continue editing it. As long as the program is still running, you cannot restart the compiler or modify the form.
This way of programming is called visual programming. While conventional programming means developing a program solely by writing instructions (text) in a programming language, visual programming means composing it wholly or in part from out-of-the-box graphical controls.
With Visual Studio, the user interface of a Windows Forms program can be designed visually. This allows you to see how the program will look later at runtime as soon as you design it. The instructions that are to take place as a response to user input (mouse clicks, etc.), on the other hand, are written conventionally in a programming language (e.g. C++).
The Properties Window
The control that was clicked last on a form (or in the pull-down menu of the Properties window) is called the currently selected control. You can identify it by the small squares on its edges, the so-called drag handles. You can drag them with the mouse to change to resize the control. A form becomes the currently selected control by clicking on a free position in the form.
Example: In the last example, button1 is the currently selected control.
In the Properties window (context menu of the control on the form, or View|Properties window – do not confuse with View|Property pages).
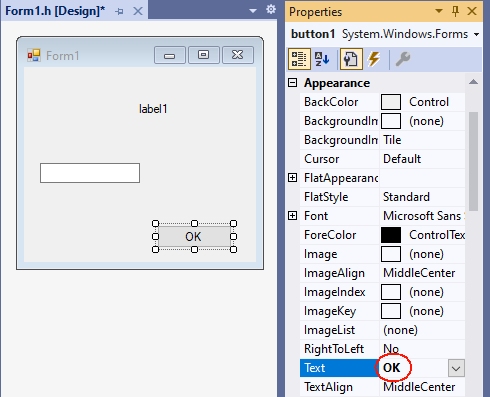
the properties of the currently selected control are displayed. The left column contains the names and the right column contains the values of the properties. With F1 you get a description of the property.
The value of a property can be changed via the right column. For some properties, you can type the new value using the keyboard. For others, after clicking on the right column, a small triangle is displayed for a pull-down menu, through which a value can be selected. Or an icon with three dots „…“ is displayed, which can be used to enter values.
Example:
- For the Text property, you can enter a text with the keyboard. For a button this text is the inscription on the button (e.g. „OK“), and for a form the title line (e.g. „My first C++ program“).
- For the BackColor property (e.g. from a button) you can select the background color via a pull-down menu.
- If you click the right column of the Font property and then the „…“ icon, you can select the font of the Text property.
A control on the form is not only adjusted to its properties in the Properties panel, but also vice versa: if you resize it by dragging the drag handles on the form, the values of the corresponding properties (Location and Size in the Layout section) in the Properties panel are automatically updated.
First steps in C++
Next, the program from Section 1.5 is to be extended so that instructions are executed in response to user input (e.g., a button click).
Windows programs can receive user input in the form of mouse clicks or keyboard input. All inputs are received centrally by Windows and passed on to the program. This triggers a so-called event in the program.
Such an event can be assigned a function that is called when the event occurs. This function is also called an event handler.
For the time being, our program should only react to the clicking of a button. The easiest way to get the function called for this event is to double-click on the button in the form. The cursor is then placed at the beginning of the function. This causes Visual Studio to generate the following function and display it in the editor:
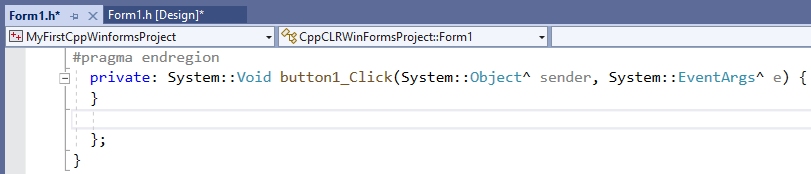
Between the curly brackets „{“ and „}“ you then write the statements to be executed when the Click event occurs.
Essentially all instructions of C++ are possible here. In the context of this simple tutorial, only some elementary instructions are to be introduced, which is necessary for the basic understanding of Visual Studio. If terms like „variables“ etc. are new to you, read on anyway – from the context you will surely get an intuitive idea which is sufficient for the time being.
A frequently used instruction in programming is the assignment (with the operator „=“), which is used to assign a value to a variable. Initially, only those properties of controls that are also displayed in the properties window are to be used as variables. These variables can then be assigned the values that are also offered in the properties window in the right column of the properties.
For the BackColor property, the allowed values are offered after the pull-down menu is expanded:
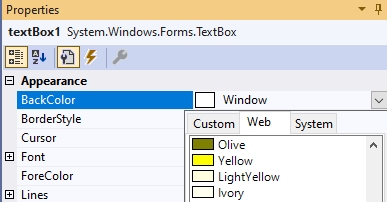
These values can be used in the program by specifying them after Color::. If you now write the statement
textBox1->BackColor = Color::Yellow;between the curly brackets
private: System::Void button1_Click(System::Object^  sender, System::EventArgs^  e)
{
 textBox1->BackColor = Color::Yellow;
}
the BackColor property of textBox1 gets the value Color::Yellow, which stands for the color yellow, when button1 is clicked during the execution of the program. If you now start the program with F5 and then click button1, the TextBox actually gets the background color yellow.
Even if this program is not yet much more useful than the first one, you have seen how Visual Studio is used to develop applications for Windows. This development process always consists of the following activities:
- You design the user interface by placing controls from the Toolbox on the form (drag and drop) and adjusting their properties in the Properties window or the layout with the mouse (visual programming).
- You write in C++ the instructions that should be done in response to user input (non-visual programming).
- You start the program and test whether it really behaves as it should.
The period of program development (activities 1. and 2.) is called design time. In contrast, the time during which a program runs is called the runtime of a program.
A simple Winforms application
Next, a simple Winforms application is to be created based on the previous explanations. It contains a button and TextBoxes for input and output:

However, you do not have to create this project yourself. If you install the Visual Studio extension

a project template with exactly this project is available in Visual Studio:
You can use this project as a basis for many applications by adding more controls and functions.
The main purpose of this project is to show how the application logic is separated from the user interface:
- The functions, classes, etc. of the application logic are written in standard C++ and are contained in a header file that is added to the project.
- The instructions for the user interface, on the other hand, are written primarily in C++/CLI and are often included in the form class in Form1..
- The functions of the header file are called when clicking a button.
The following is a simplified version of chapter 2.11 from my book „C++ mit Visual Studio 2019 und Windows Forms-Anwendungen“. There I recommend such a project for the solutions of the exercises. In the header file of such a project you can include the solutions of several exercises or distribute them to different header files. For each subtask you can put a button (or menu options) on the form. This way you don’t have to create a new project for each subtask.
Of course, outsourcing your own instructions to an extra file (as in 3.) and accessing the controls via function parameters is somewhat cumbersome: however, it leads to clearer programs than if all instructions are located in the form file within the Form1 class. This saves many programming errors that lead to obscure error messages, and makes it easier to search for errors.
1. Create the project
Create a new project with File|New|Project|CppCLR_WinformsProject (see section 1.1).
The following examples assume a project named CppCLR_Winforms_GUI.
2. Design the user interface (the form)
The form is then designed to contain all the controls needed to input and output information and start actions. This is done by dragging appropriate controls from the toolbox onto the form.
For many projects (e.g. the exercises from my book) the following controls are sufficient:
- A multiline TextBox (see Section 2.3.2 of my book) to display the results.
- A single-line TextBox for entering data
- One or more buttons (or menu options, etc.) to start the instructions
A TextBox becomes multiline TextBox by the value true of the MultiLine property. The TextBox for output is to be named out_textBox:
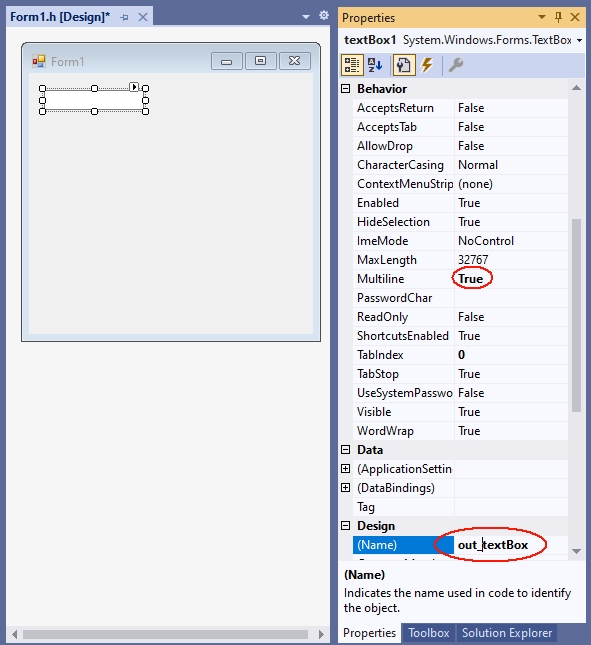
The TextBox for entering data will be named in_textBox:
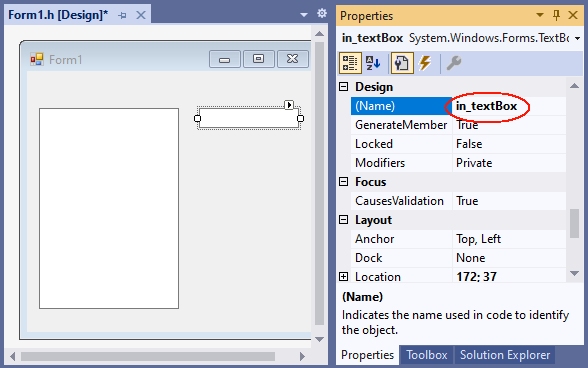
Since the function plus_1 is called when the button is clicked, it is given the caption „plus 1“ and the name button_plus1:

The functions, declarations, classes etc. of the so-called application logic are placed in a separate header file, which is added to the project with Project|Add new element|Visual C++|Code as header file(.h) with the name Header1.h. In practice, however, you should group functions and classes that belong together conceptually in a header file, and then give the header file a more meaningful name than Header.h.
The application logic is then included in the header file. These are mostly functions, classes, etc. written in C++. In our first example, this should be a function with the name plus_1, which returns the value of the argument increased by 1:
In a C++ Windows Forms project, the application logic consists primarily of functions, classes, etc. written in C++, without C++/CLI language elements. In our first example, this should be a function named plus_1, which returns the value of the argument incremented by 1:
int plus_1(int x)
{
  return x + 1;
}
Diese Datei wird dann vor dem namespace des Projekts mit einer #include-Anweisung in die Formulardatei (z.B. Form1.h) aufgenommen:
This file is then included in the form file (e.g. Form1.h) before the namespace of the project with an #include statement:
#pragma once
#include "Header1.h" // <-- manuell einfügen. nach dem Eintippen von
                     // "#include " bietet Visual Studio die Datei an.
namespace CppCLRWinFormsProject {
  using namespace System;
    ...
}
4. Calling the functions
By double-clicking the button on the form, Visual Studio creates the function (the event handler) that will be called when the button is clicked when the program is running:
private: System::Void button_plus_1_Click(System::Object^ sender, System::EventArgs^ e)
{
}
In this event handler you then call the corresponding function. In this simple tutorial this is the function plus_1 from the file Header.h.
- If this function uses user input, you read it in via a TextBox. In this simple tutorial, it will be a number that is read from the in_TextBox.
- If a parameter of the called function does not have type String (the type of the property in_textBox->Text), the string must be converted to the type of the parameter. This is possible with one of the Convert:: functions.
- The results are to be displayed in the out_textBox. This can be done with the function out_textBox->AppendText. The string that AppendText expects can be created with String::Format. In the first argument (a string) you specify {0} for the first value after the string, {1} for the second and so on.
private: System::Void button_plus_1_Click(System::Object^ sender, System::EventArgs^ e)
{
int n = Convert::ToInt32(in_textBox->Text);
int result = plus_1(n);
out_textBox->AppendText(String::Format("plus_1({0})={1}rn",n,result));
}
If you enter a number in the input field after starting this program with F5 and then click on the button, the value incremented by 1 is displayed in the output text box:
For each further function whose result is to be displayed, a button is placed on the form and given a suitable name (Name property) and a suitable label (Text property). This function is then called in the associated event handler.
With this all relevant parts of the ??? CppCLR_Winforms_GUI are presented. You can enhance it as you like with additional controls (buttons, menus, etc.). See chapter 2 of my book for more information.
5. GUI and application logic not so strictly separated
In the version created under 1. to 4. the application logic is strictly separated from the user interface: The access to the user interface with C++/CLI is exclusively done in Form1.h. In Header1.h, however, only standard C++ is used. This has in particular the advantage that one can use this header also in other platforms (e.g. console applications, Qt, Mac).
However, in the early stages of a project, when there is still a lot of experimenting going on, it can be a bit cumbersome if you have to change the calls in another file every time you change a parameter list. And for applications that are not intended to be used for other platforms at all, this strict separation doesn’t help much. This often applies to exercise tasks as well.
This jumping back and forth between different files can be avoided by relaxing the strict separation between the application logic and the user interface by including access to the controls in the header file as well.
Accessing controls in a header file is enabled by inserting
using namespace System;
using namespace System::Windows::Forms;
into the header file at the beginning. Then you can also use the types of the controls in the header file (e.g. as parameters) and include the statements that were in the buttonClick function in Form1.h under 4.
This procedure is implemented in the Header2.h file:
#pragma once
using namespace System;
using namespace System::Windows::Forms;

int plus_2(int x)
{
  return x + 2;
}

void plus_2_Click(TextBox^ in_textBox, TextBox^ out_textBox)
{
int n = Convert::ToInt32(in_textBox->Text);
int result = plus_2(n);
out_textBox->AppendText(String::Format("plus_2({0})={1}rn", n, result));
}
Here you pass a parameter for the control to the function. Please note that you must specify a ^ after the name of a .NET type (e.g. TextBox, Button). In the function you then address the control under the name of the parameter.
This function can be called when a button is clicked:
private: System::Void button_plus_1_Click(System::Object^ sender, System::EventArgs^ e)
{
plus_2_Click(in_textBox, out_textBox);
}
6. Analogy to console applications
Comparing of this Windows Forms project with a corresponding console application shows the analogy of the two types of projects. This analogy shows how to convert a console application into a forms application: If you have a console program like
#include<iostream>
int main()
{
int n;
std::cin >> n;
int result = plus_2(n);
std::cout << "plus_2(" << n << ") = " << result << std::endl;
return 0;
}
you can port it to a form application with relatively little effort. You just need to replace the I/O statements and call the functions in response to a ButtonClick, etc:
private: System::Void button_plus_1_Click(System::Object^ sender, System::EventArgs^ e)
{
int n = Convert::ToInt32(in_textBox->Text);
int result = plus_1(n);
out_textBox->AppendText(String::Format("plus_1({0})={1}rn",n,result));
}
Excerpt from the preface to my book „C++ mit Visual Studio 2019 und Windows Forms-Anwendungen“
The preface to my book (in German)
teaches C++ with Windows Forms applications in more detail.
Preface
The starting point for this book was the desire for a C++ textbook in which programs for a graphical user interface (Windows) are developed from the beginning, and not console applications as is usually the case. Programs in which inputs and outputs are done via a console are like stone-aged DOS programs for many beginners and discourage them from wanting to deal with C++ at all.
Windows Forms applications are an ideal framework for C++ programs with an attractive user interface: access to Windows controls (Buttons, TextBoxes etc.) is easy. The difference to a standard C++ program is mostly only that inputs and outputs are done via a Windows control (mostly a TextBox)
textBox1->AppendText(„Hello World“);
while in standard C++ the console is used with cout:
cout << "Hello world" << endl;
But not only students can benefit from C++ with a graphical user interface. With Windows Forms projects, existing C or C++ programs can be enhanced with a graphical user interface without much effort. And those who know C or C++ and do not want to learn a new language for a GUI can make their existing programs more beautiful and easier to use with simple means.
C++ has developed rapidly in recent years: The innovations of C++11, C++14, C++17 and C++20 have brought many improvements and new possibilities. Much of what was good and recommended in 2010 can be made better and safer today.
As a book author and trainer who has accompanied this whole evolution, you notice this particularly clearly: many things that have been written in the past should be done differently today. True, it would still be compiled. But it is no longer modern C++, which corresponds to the current state of the art and uses all the advantages.
This book introduces C++ at the Visual Studio 2019 level in May 2020. This is the scope of C++17.
Introduction
In this article, I am going to explain how to connect Visual Studio 2022 Version 17.0 after installation is complete, and how to create a simple ASP.NET Core MVC 6.0 Web application.
Microsoft’s 64-bit Visual Studio IDE officially launched on November 8, 2021.
I have already installed Visual Studio 2022 Version 17.0 Community Edition in my system. Visual Studio 2022 Version 17.0 supports Asp.Net Core MVC 6.0 application.
Read my previous article “How To Install Visual Studio 2022” before reading this article. Click here. It talks about how to download and install Visual Studio 2022 Community Edition.
Prerequisites
- Visual Studio 2022 Community Edition
Connect To Visual Studio 2022 Community Edition
Step 1
First, install Visual Studio 2022 in your system.
Step 2
Go to all programs in your systems, we can see Visual Studio 2022 current and Visual Studio Installer.
Step 3
Double-click on Visual Studio 2022 Current and it will open. It looks like the below screenshot. Opening it the first time it will take few time.
Creating Your First Project
Click on, Create a new Project to create a new project.
You can see various project types there. Choose “Asp.Net Core MVC Web Application” project type for now.
Select Asp.Net Core MVC Application, and then click Next.
Give a valid name to your project and select a path for it. Then click Next button.
Now, choose framework .NET 6.0.Then click the create button.
Asp.Net Core MVC 6.0 application created and project structure is shown below,
Now, build and run the application. I have made some minor changes in the view pages.
Output
Conclusion
In this article, we explained how to connect Visual Studio 2022 Version 17.0. We also created a simple “Asp.NetCore6Demo” Asp.Net Core MVC 6.0 web application.
You will learn more new features of Visual Studio 2022 in my upcoming articles.
Chittaranjan Swain

If you are keeping an eye on the progress of
ASP.NET Core 6 you are probably aware that
.NET 6,
C# 10, and
Visual Studio 2022 have been released. There are lots of new things, small
to big, added to the overall .NET family and I have discussed a few of them in
my previous articles. In this article I will show you how to create your first
web application in Visual Studio 2022. I assume that you are already familiar
with Visual Studio 2019 and ASP.NET Core in general. This is going to be a quick
introduction to give you a feel of the new IDE and project structure.
Before you go any further, install
Visual
Studio 2022 edition of your choice.
So, let’s get going!
Open Visual Studio 2022 as shown below.

This dialog should look familiar to you because it’s quite similar to Visual
Studio 2019.
Click on the Create a new project option to reveal the project templates.

Here you can see a list of all available project templates. I have filtered
them for C# language and Web project type. As far as ASP.NET Core is concerned
the main project templates that you find listed here include:
- ASP.NET Core Web App (Razor Pages)
- ASP.NET Core Web App (Model-View-Controller)
- ASP.NET Core Empty
- Blazor Server App
- Blazor WebAssembly App
- ASP.NET Core Web API (by default uses controller based API but can be
changed to Minimal API during project creation) - ASP.NET Core gRPC Service
- Razor Class Library
For this example we will deliberately use ASP.NET Core Empty project template
so that we can setup everything on our own rather than relying on the default
project items.
So, pick ASP.NET Core Empty and hit the Next button.
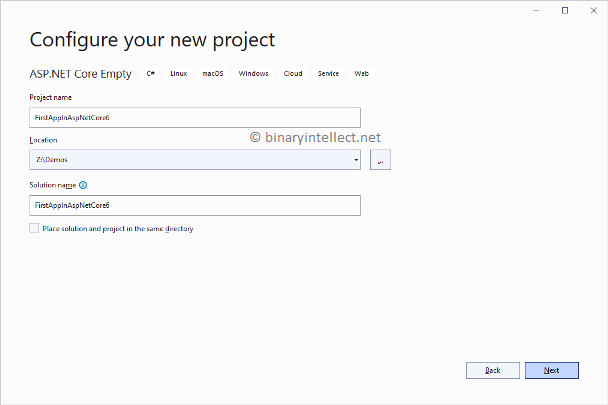
Specify some project name (FirstAppInAspNetCore6 in this case) and location
and click on the Next button.

In this dialog you can select a .NET version. When you install Visual Studio
2022, .NET 6 is automatically installed for you and hence this dropdown
currently has only that entry. The Configure for HTTP checkbox is checked
indicating that you want to use Visual Studio’s development SSL certificate
while developing the project.
Click on the Create button to finish the project creation wizaed and to
create the project as per our specifications. The following figure shows how the
Solution Explorer looks like with the Empty project loaded.

Notice that there is no Startup.cs file because VS2022 project templates use
the new hosting APIs for
the projects. Previously you rarely tampered with Project.cs file. But now
Program.cs has a lot more responsibility as you will see shortly.
Double click on the project name in Solution Explorer to open its .csproj
file in the editor.
<Project Sdk="Microsoft.NET.Sdk.Web">

  <PropertyGroup>
    <TargetFramework>net6.0</TargetFramework>
    <Nullable>enable</Nullable>
    <ImplicitUsings>enable</ImplicitUsings>
  </PropertyGroup>

</Project>
As you can see the project’s SDK is Microsoft.NET.Sdk.Web. The target
framework is set to net6.0 indicating that we are using .NET 6. Notice the
Nullable and ImplicitUsings elements.
The <Nullable> element decides the project wide behavior of
Nullable reference types. The value of enable indicates that the Nullable
reference types are enable for the project.
The <ImplicitUsings> element can be used to enable or disable what is known
as Implicit Usings for the project. When <ImplicitUsings> is set to enable,
certain common namespaces are implicitly imported for you. You can read more
about this feature
here.
You can also take a look at these project settings (and modify them if
required) using the project’s properties page. To open the project’s property
page right click on the project in Solution Explorer and click on Properties
shortcut menu option. The following figure shows a part of this properties page.

You can also search for a particular project setting such as target
framework, nullable, or implicit usings this page as shown below:

For this example we won’t change any of these settings. So, let them be at
their default values and proceed to the next step.
Now add Models, Views, and Controllers folders as usual. And also add a model
class named MyModel to the Models folder.

The default MyModel class contains the following code:
namespace FirstAppInAspNetCore6.Models
{
    public class MyModel
    {
    }
}
Let’s change this code to use file scoped namespaces.
namespace FirstAppInAspNetCore6.Models;

public class MyModel
{
    public string Message { get; set; }
}
As you can see the namespace line now has a semicolon at the end and doesn’t
wrap the class inside curly brackets. This indicates that the whole content of
the file that follows is part of the FirstAppInAspNetCore6.Models namespace.
Thus, MyModel class will be a part of FirstAppInAspNetCore6.Models namespace.
Also note that we have added Message string property to the MyModels class.
You will notice that the Message property shows a green underline and
displays this warning message:

Open the .csproj file again and change the value of <Nullable> element to
disable.
<TargetFramework>net6.0</TargetFramework>
<Nullable>disable</Nullable>
<ImplicitUsings>enable</ImplicitUsings>
You will find that the warning disappears. We did this just to check the
effect of <Nullable> project settings on the code. Change the <Nullable> setting
back to enable.
Let’s also check the effect of <ImplicitUsings> element. Change its value to
disable and try building the application.
<TargetFramework>net6.0</TargetFramework>
<Nullable>enable</Nullable>
<ImplicitUsings>disable</ImplicitUsings
You will get this error message in Program.cs file.

Why did this error occur? That’s because the WebApplication class resides in
the Microsoft.AspNetCore.Builder namespace. When <ImplicitUsings> was enable,
this namespace got automatically imported for us. When we disabled implicit
usings, the Microsoft.AspNetCore.Builder namespace was no longer automatically
imported for us and the compiler generated the error.
Change <ImplictUsings> back to enable and build the application again. This
time the error will disappear and the app will build successfully.
Now add HomeController class to the Controllers folder using Add New Item
dialog.

The default HomeController class looks like this:
using Microsoft.AspNetCore.Mvc;

namespace FirstAppInAspNetCore6.Controllers
{
    public class HomeController : Controller
    {
        public IActionResult Index()
        {
            return View();
        }
    }
}
This code should look familiar to you. We will change this code to the
following:
global using Microsoft.AspNetCore.Mvc;

namespace FirstAppInAspNetCore6.Controllers;

public class HomeController : Controller
{
    public IActionResult Index()
    {
        return View();
    }
}
Notice the code marked in bold letters.
The using statement at the top now has global keyword added to it. This will
automatically import the concerned namespace in all the C# classes. For example,
if you have three controller classes then you no longer need to use
Microsoft.AspNetCore.Mvc in all of them. Just one «global» using will make it
available for all C# classes. You can separate all the global using directives
in a separate .cs file. For example, you can place the above global using inside
a file named GlobalUsings.cs. This way you can manage all the global usings at
one place (for this example you will need to import FirstAppInAspNetCore6.Models
and Microsoft.AspNetCore.Mvc). The following figure shows such a file in a sample project.

The HomeController.cs also uses file scoped namespace —
FirstAppInAspNetCore6.Controllers — as discussed earlier.
Now modify the Index() action as shown below:
public class HomeController : Controller
{
    public IActionResult Index()
    {
        MyModel model = new MyModel()
        {
            Message = "Hello World!"
        };
        return View(model);
    }
}
This code is quite straightforward. We simple create an object of MyModel,
set its Message property, and pass it to the Index view.
Next, add the Index view using Add New Item dialog.

Write this markup and code in Index.cshtml:
@model FirstAppInAspNetCore6.Models.MyModel

<h1>@Model.Message</h1>
We haven’t added _ViewImports file in the project and hence we need to
specify the fully qualified name of the model class in the @model directive.
Before we run the application we need to configure the application’s startup.
Open Program.cs and add the following code to it:
var builder = WebApplication.CreateBuilder(args);

builder.Services.AddControllersWithViews();

var app = builder.Build();

app.UseHttpsRedirection();
app.UseStaticFiles();
app.UseRouting();

app.MapGet("/hello", () => {
    return new List<string>() {
        "Hello World!",
        "Hello Galaxy!",
        "Hello Universe!"
    };
});

app.MapDefaultControllerRoute();

app.Run();
Previously we used two separate files namely Program.cs and Startup.cs to
configure app hosting and startup. Now, that task happens in Program.cs itself.
The new hosting APIs and
new routing APIs along
with
C# top level statements simplify this process to a large extent.
First, we create a WebApplicationBuilder using the CreateBuilder() method.
Then we register MVC specific services with DI container using the
AddControllersWithViews() method.
Once a WebApplication instance is built with the help of Build() method we
wire a series of middlewares to the HTTP pipeline. This is done using a series
of UseXXXXXXX() methods.
Finally, we configure the routing endpoints. The MapGet() method configures a
minimal API endpoint at
/hello and MapDefaultControllerRoute() takes of the default MVC routing —
/controller/action. The MapGet() handler delegate simply returns a List of
string messages to the caller. We will invoke this minimal API endpoint from the
browser.
The Run() method starts the web application.
Now that our app startup is done, we are ready to run the application. Click
on the Start Debugging icon from the Visual Studio toolbar or press F5. You will
notice that Visual Studio 2022 uses Kestrel web server by default rather than
IIS Express. Of course, you can switch them from the toolbar menu.

Visual Studio 2022 may prompt you about the development SSL certificate. If
all goes well you will see «Hello World!» in the browser as shown below:

Notice that the Kestrel web server now uses a randomly generated port numbers
instead of fixed 5000 and 5001. You can configure them in launchSettings.json
file under Properties folder.
"FirstAppInAspNetCore6": {
    "commandName": "Project",
    "dotnetRunMessages": true,
    "launchBrowser": true,
    "applicationUrl": "https://localhost:7286;
                       http://localhost:5286",
    "environmentVariables": {
    "ASPNETCORE_ENVIRONMENT": "Development"
    }
}
Now, go to the browser’s address bar and navigate to /hello to check whether
the minimal API endpoint works as expected. Here is the outcome:

As you can see, we get a JSON array with the three string messages.
Let’s conclude this exploration by checking
Hot Reload in action.
Run the application as before so that «Hello World!» is displayed in the
browser.
When you run the app, Visual Studio hot reload button menu will be enabled
for you like this:

Hot reload allows you to make changes to the HTML, CSS, and C# code and apply
them to the app running in the browser, all without stopping and restarting the
app.
To test the basic usage of hot reload, go to the Index() action and change
the message from «Hello World!» to «Hello Universe!» (don’t stop the app, it
should be running in the browser).
public IActionResult Index()
{
    MyModel model = new MyModel()
    {
        Message = "Hello Universe!"
    };
    return View(model);
}
Also open the Index.cshtml and change <h1> to <h3>.
<h3>@Model.Message</h3>
Save both the files, click on the Hot Reload buton (see above figure), and
refresh the browser window. You will see the changed message and markup as shown
below:

You can further simplify the process of applying the changes by selecting the
«Hot Reload on File Save» option. This will perform hot reload as soon as you
save the changes (you won’t need to explicitly click on the Hot Reload button).
To summarize, we touched upon several improvements in ASP.NET Core 6 projects
and Visual Studio 2022 including <Nullable>, <ImplicitUsings>, global usings,
file scoped namespaces, new way of app startup, minimal API, and hot reload.
That’s it for now! Keep coding!!
На чтение 7 мин Просмотров 3.2к. Опубликовано 07.04.2022
Освойте Microsoft Visual Studio и разрабатывайте собственные приложения с помощью Windows Forms практически без написания кода.
Windows Forms — это платформа, доступная в Visual Studio, которая позволяет создавать настольные приложения с помощью графического пользовательского интерфейса. Это позволяет вам щелкать и перетаскивать виджеты, такие как кнопки или метки, прямо на холст и управлять свойствами каждого виджета, такими как размер шрифта, цвет или граница.
В этой статье простой конвертер градусов Цельсия в градусы Фаренгейта будет использоваться в качестве примера для изучения основ настройки приложения Windows Form. В этом руководстве используется Visual Studio 2019 Community Edition.
Содержание
- Как создать проект Windows Forms в Visual Studio
- Как добавить элементы на холст проекта
- Как обрабатывать события и писать код в коде программной части
- Как запускать и отлаживать программу Windows Forms
- Отладка программы Windows Forms
- Запуск программы с помощью исполняемого файла
- Добавление дополнительных элементов в форму Windows
Как создать проект Windows Forms в Visual Studio
Сначала создайте проект в Visual Studio.
- Откройте Visual Studio и выберите Создать новый проект.
- Visual Studio предоставит вам список шаблонов проектов, из которых вы можете выбрать.
- Чтобы создать приложение Windows Forms, найдите приложение Windows Formи выберите его из списка шаблонов. Как только это будет выбрано, нажмите » Далее».

- Добавьте имя и местоположение для проекта и нажмите » Далее». Расположение — это каталог, в котором будут храниться файлы кода.
- На следующем экране сохраните выбор по умолчанию.NET Core 3.1.
- Щелкните Создать.
- Когда Visual Studio завершит создание проекта, он откроется.


Как добавить элементы на холст проекта
Холст — это белая область, расположенная в верхнем левом углу экрана. Нажмите и перетащите точки в нижней, правой или нижней правой части холста, чтобы изменить его размер, если это необходимо.
Чтобы создать пользовательский интерфейс приложения, добавьте на холст такие виджеты, как кнопки или текстовые поля.
- Откройте вкладку «Вид» в верхней части окна и выберите » Панель инструментов «.

- Это добавит панель инструментов в левую часть приложения. Выберите значок булавкив правом верхнем углу панели инструментов, чтобы закрепить его там навсегда.
- Здесь вы можете перетащить любой виджет из панели инструментов на холст. Выделите кнопку на панели инструментов и перетащите ее на холст.

- Перетащите на холст еще два текстовых поля вместе с тремя метками (две метки для каждого текстового поля и одна метка для заголовка в верхней части приложения).

- Каждый виджет на холсте имеет связанные с ним свойства. Выделите виджет, чтобы отобразить окно свойствв правом нижнем углу Visual Studio, в котором перечислены все свойства этого виджета. Эти свойства могут включать текст, имя, размер шрифта, границу или выравнивание выделенного виджета.
- На данный момент текст этих виджетов по-прежнему говорит label1, label2или button1. Выберите виджет label1и отредактируйте свойство Text в окне свойств, указав «Цельсий в Фаренгейт». Измените размер шрифта на 22pt.

- Аналогичным образом отредактируйте свойства других виджетов на холсте, чтобы они были следующими:


|
Виджет |
Имущество |
Новое значение |
| метка2 | Текст | Цельсия |
| этикетка3 | Текст | по Фаренгейту |
| кнопка | Текст | Рассчитать |
| Текстовое поле Фаренгейта | Только для чтения | Истинный |
Как обрабатывать события и писать код в коде программной части
Виджеты на холсте можно привязывать к событиям. События могут включать в себя такие вещи, как нажатие кнопки, изменение текста внутри текстового поля или выбор определенного переключателя. Когда происходят эти события, это может привести к срабатыванию части кода в программном коде.
C# — это язык, используемый при создании Windows Forms. Если вы еще не использовали C#, есть много практических причин для изучения программирования на C#.
Для этого конкретного приложения добавьте событие к кнопке » Рассчитать «, чтобы инициировать выполнение части кода при нажатии этой кнопки.
1. Дважды щелкните кнопку » Рассчитать«, чтобы автоматически открыть Form1.cs с новым методом Event:
private void calculateButton_Click(object sender, EventArgs e)
2. Здесь вы добавите код, который будет выполнять расчет градусов Цельсия по Фаренгейту и отображать результат в текстовом поле Фаренгейта. Для этого вам нужно иметь возможность прочитать значение из текстового поля Цельсия и изменить текстовое поле Фаренгейта, чтобы отобразить результат.
3. Вернитесь на холст и повторно отредактируйте свойства, как показано ранее. На этот раз отредактируйте свойство Nameдля текстовых полей Цельсия и Фаренгейта. Эти имена можно использовать для ссылки на текстовые поля в коде.
| Виджет | Имущество | Новое значение |
| Текстовое поле Цельсия | Имя | ЦельсияTextBox |
| Текстовое поле Фаренгейта | Имя | по ФаренгейтуTextBox |
4. Вернитесь к функции calculateButton_Click в Form1.cs.
5. Теперь на текстовое поле Celsius можно ссылаться в коде, используя имя «celsiusTextBox». Введенное пользователем значение Цельсия сохраняется в его свойстве Text. Однако, поскольку это строка, разберите ее на двойную, чтобы включить ее в будущие расчеты по Фаренгейту.
private void calculateButton_Click(object sender, EventArgs e)
{
// Get the value that the user entered in the Celsius Text Box
double celsiusValue = Double.Parse(celsiusTextBox.Text);
}
6. Переменная celsiusValue теперь хранит значение, введенное пользователем в текстовом поле Celsius. Формула для преобразования градусов Цельсия в градусы Фаренгейта: (celsiusValue * 9 / 5) + 32.Таким образом, результат теперь можно рассчитать и сохранить в текстовом поле Фаренгейта.
private void calculateButton_Click(object sender, EventArgs e)
{
// Get the value that the user entered in the Celsius Text Box
double celsiusValue = Double.Parse(celsiusTextBox.Text);
// Apply the calculation
double result = (celsiusValue * 9 / 5) + 32;
// Store the result in the Fahrenheit Textbox
fahrenheitTextBox.Text = result.ToString();
}
Как запускать и отлаживать программу Windows Forms
Запуск программы Windows Forms в Visual Studio
Теперь, когда пользовательский интерфейс и логика кода настроены, запустите программу, чтобы увидеть, как она работает.
1. Чтобы запустить программу, выберите зеленую стрелку вверху панели инструментов в Visual Studio. 
2. После загрузки проекта добавьте значение в текстовое поле Цельсия и нажмите кнопку » Рассчитать». Это добавит результат в текстовое поле по Фаренгейту. 
3 Если программа размыта во время выполнения, вероятно, ваше приложение не поддерживает DPI. Это может вызвать проблемы с масштабированием и разрешением, поэтому его необходимо включить.
4. Щелкните правой кнопкой мыши проект TemperatureConverterв обозревателе решений. Выберите Добавить, затем выберите Новый элемент.
5. Найдите файл манифеста приложения и нажмите » Добавить «. 
6. Скопируйте следующий код в новый файл app.manifest как дочерний элемент тега сборки (если код уже сгенерирован, просто раскомментируйте его).
<application xmlns=»urn:schemas-microsoft-com:asm.v3″>
<windowsSettings>
<dpiAware xmlns=»http://schemas.microsoft.com/SMI/2005/WindowsSettings«>true</dpiAware>
<longPathAware xmlns=»http://schemas.microsoft.com/SMI/2016/WindowsSettings«>true</longPathAware>
</windowsSettings>
</application>
7. Чтобы это изменение вступило в силу, перезапустите программу. Нажмите красную кнопку остановки в верхней части панели инструментов, затем снова нажмите зеленую кнопку воспроизведения.
Отладка программы Windows Forms
Вы можете отладить программу, если логика вашего приложения Windows Forms не работает должным образом.
- Вернитесь к функции calculateButton_Click в Form1.cs и щелкните в любом месте серой полосы в крайнем левом углу экрана. Это добавит точку останова, которая обозначена красным кружком.
- Нажмите кнопку «Рассчитать» еще раз, чтобы запустить этот метод. Программа приостановится, когда достигнет точки останова, чтобы показать все значения, хранящиеся в переменных в этой точке.
- Чтобы продолжить работу программы, нажмите зеленую стрелку » Продолжить» в верхней части панели инструментов.

Запуск программы с помощью исполняемого файла
Если вы не хотите запускать свою программу через Visual Studio, используйте автономный исполняемый файл для программы. Это автоматически генерируется.
Перейдите к исполняемому файлу, который можно найти здесь:
<your-project-folder>/bin/Debug/netcoreapp3.1/TemperatureConverter.exe
Нажмите на исполняемый файл, чтобы запустить программу напрямую.
Добавление дополнительных элементов в форму Windows
Надеюсь, теперь у вас есть общее представление об основной структуре приложения Windows Form. Вы можете продолжить изучение дополнительных функций Windows Forms, поэкспериментировав с новыми виджетами и углубившись в другие различные события, которые можно обрабатывать.
Как только вы лучше познакомитесь с Windows Forms, вы сможете приступить к созданию более сложных приложений. Вы также можете изучить многие другие способы создания приложений на рабочем столе Windows.
Working with C#
The C# support in Visual Studio Code is optimized for cross-platform .NET development (see working with .NET and VS Code for another relevant article). Our focus with VS Code is to be a great editor for cross-platform C# development.

VS Code supports debugging of C# applications running on either .NET or Mono.
For detailed instructions on:
- .NET debugging — see the Microsoft C# extension’s GitHub page.
- Mono debugging — see the Mono Debug extension’s README.
Note: VS Code has limited support for debugging applications running on the Desktop .NET Framework.
Due to this focus, many standard C# project types are not recognized by VS Code. An example of a non-supported project type is an ASP.NET MVC Application (though ASP.NET Core is supported). In these cases, if you want to have a lightweight tool to edit a file — VS Code has you covered. If you want the best possible experience for those projects and development on Windows in general, we recommend you use Visual Studio Community.
Installing C# support
C# language support is an optional install from the Marketplace. You can install it from within VS Code by searching for ‘C#’ in the Extensions view (⇧⌘X (Windows, Linux Ctrl+Shift+X)) or if you already have a project with C# files, VS Code will prompt you to install the extension as soon as you open a C# file.
Roslyn and OmniSharp
Visual Studio Code uses the power of Roslyn and OmniSharp to offer an enhanced C# experience. We offer support for:
- .NET projects
- MSBuild projects
- C# scripts (CSX)
On startup the best matching projects are loaded automatically but you can also choose your projects manually. The status bar will show what projects have been loaded and also allows you to select a different set of projects. To do so, click on the status bar projects item and select Change projects…. In the image below a single project has been picked up:

The available options include:
- Selecting a
project.jsonfile will open a .NET project and VS Code will load that project plus the referenced projects. - Selecting a
*.slnfile opens a MSBuild-project. It will load the referenced*.csprojprojects and sibling or descendantproject.jsonfiles but no other project files that are referenced from the solution file. - Selecting a
folderwill make VS Code scan for*.sln,project.jsonand*.csxfiles (C# scripts) and VS Code will attempt to load them all.
Once the project is loaded the enhanced experiences light up…
Editing Evolved
There is a lot to discover with C# and the editor, such as format on type, IntelliSense, the rename-refactoring, etc.

For a full description of our editing features, go to the Basic Editing and Code Navigation documentation.
Here are a few highlights…
IntelliSense
IntelliSense just works: hit ⌃Space (Windows, Linux Ctrl+Space) at any time to get context specific suggestions.
Enhance completions with AI
GitHub Copilot is an AI-powered code completion tool that helps you write code faster and smarter. You can use the GitHub Copilot extension in VS Code to generate code, or to learn from the code it generates.

GitHub Copilot provides suggestions for numerous languages and a wide variety of frameworks, and it works especially well for Python, JavaScript, TypeScript, Ruby, Go, C# and C++.
You can learn more about how to get started with Copilot in the Copilot documentation.
Snippets for C#
We have several built-in snippets included in VS Code that will come up as you type or you can press ⌃Space (Windows, Linux Ctrl+Space) (Trigger Suggest) and we will give you a context specific list of suggestions.
Tip: You can add in your own User Defined Snippets for C#. Take a look at User Defined Snippets to find out how.
Search for Symbols
There are also features outside the editor. One is the ability to search for symbols from wherever you are. Hit ⌘T (Windows, Linux Ctrl+T), start typing, and see a list of matching C# symbols. Select one and you’ll be taken straight to its code location.
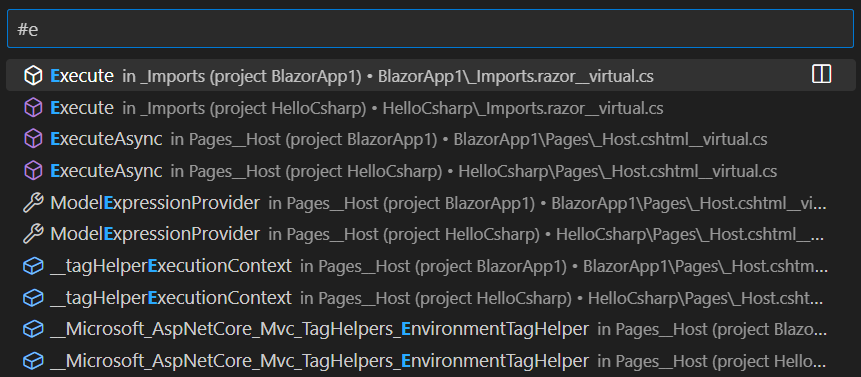
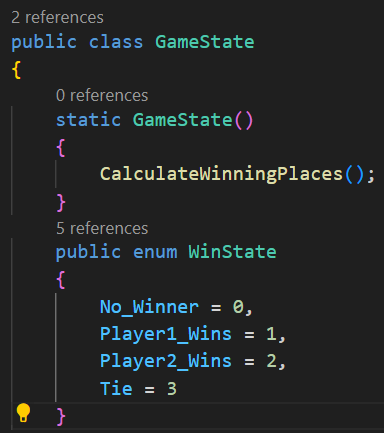
CodeLens
Another cool feature is the ability to see the number of references to a method directly above the method. Click on the reference info to see the references in the Peek view. This reference information updates as you type.
Note: Methods defined in
object, such asequalsandhashCodedo not get reference information due to performance reasons.
Tip: You can turn off references information displayed in CodeLens with the
editor.codeLenssetting.
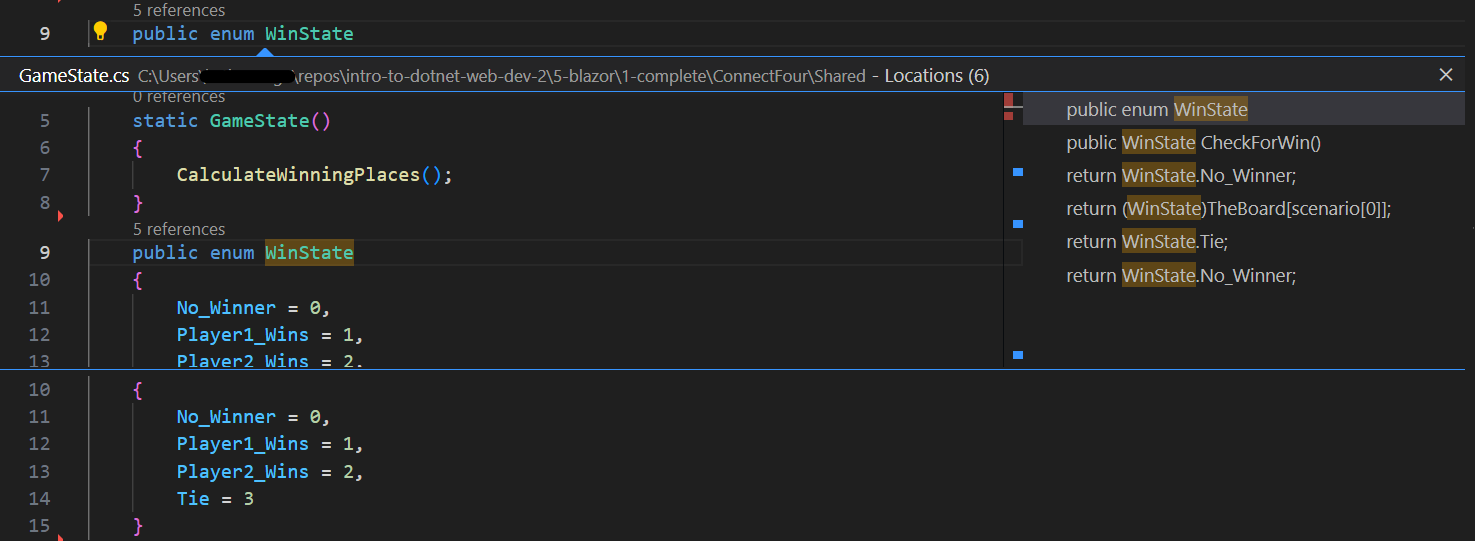
Find References/Peek Definition
You can click on the references of an object to find the locations of its use in place without losing context. This same experience works in reverse where you can Peek the definition of an object and see it inline without leaving your location.
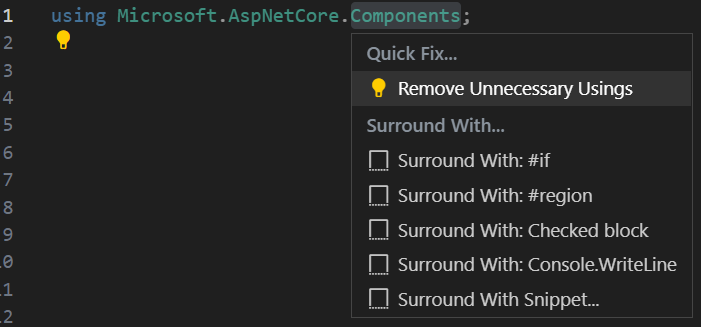
Quick Fixes / Suggestions
There are some basic quick fixes supported in VS Code. You will see a lightbulb and clicking on it, or pressing ⌘. (Windows, Linux Ctrl+.) provides you with a simple list of fixes/suggestions.
Next steps
Read on to find out about:
- .NET Development — get up and running with cross-platform .NET
- Basic Editing — Learn about the powerful VS Code editor.
- Tasks — Use tasks to build your project and more.
- Debugging — Find out how to use the debugger with your project.
- Unity development — Learn about using VS Code with your Unity projects.
Common questions
My Project won’t load
VS Code only supports a limited set of project types. For full .NET project support, we suggest you use Visual Studio Community.
IntelliSense is not working
This is typically as a result of the current project type not being supported. You can see an indication in the OmniSharp flame in the bottom left hand side of the status bar.
How do I build/run my project?
VS Code supports tasks for build and natively understand the output of MSBuild, CSC, XBuild. Find out more in the Tasks documentation.
I’m missing required assets to build and debug C# in VS Code. My debugger says «No Configuration»
The Visual Studio Code C# extension can generate the assets you need to build and debug. If you missed the prompt when you first opened a new C# project, you can still perform this operation through the Command Palette (View > Command Palette ⇧⌘P (Windows, Linux Ctrl+Shift+P)) by typing ‘.NET’, and running .NET: Generate Assets for Build and Debug. This command will generate the necessary launch.json and tasks.json configuration files (under the .vscode folder).
7/16/2018